Many domains have old computer accounts that are no longer in use. The windows server 2003 support tools has a utility that lets you view old accounts.
To view computer accounts that have not been logged into for 8 weeks type:
dsquery computer -inactive 8 -limit 0
To delete computer accounts that have not been logged into for 8 weeks type:
dsquery computer -inactive 8 -limit 0 dsrm
If your running Windows 2000 Domain Functional Level you will recieve the following error:
dsquery failed:The parameter is incorrect.:Windows could not run this query because you are connected to a domain that does not support this query.
This is because Windows 2000 Domain Functional Level does not lastLogonTimestamp attribute on user and computer objects.
Thursday, April 30, 2009
Sunday, April 26, 2009
Migrate Bookmarks from Firefox to Internet Explorer
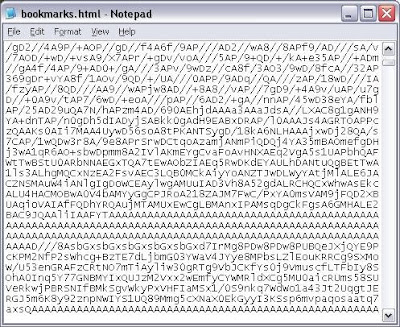
Most articles on the internet describe how to use Firefox to import your favorites from Internet Explorer into Firefox. However I needed to move bookmarks out of Firefox back into favorites in Internet Explorer. All the bookmarks in Firefox are stored in a file called bookmarks.html which is located under the Firefox profile inside the users windows profile.
The Firefox profile is located in the following location:
C:\Documents and Settings\username\Application Data\Mozilla\Firefox\Profiles\5hh2ca14.default

Much of the contents of this file is in gobbley gook which can only be read by Firefox itself.
After a good hunt around on the internet I discovered a little third party tool 45.4 KB in size that converts back the bookmarks.html file to Internet Explorer favorites. This tool can be downloaded from:
http://downloads.pcworld.com/pub/new/internet/browsers_and_clients/favtool.exe
When you launch the executable file, you will be presented with the following screen. Simply enter in the Favorites folder location under your user profile then click Import Bookmarks into Favorites. In the window that pops up specify the location of the bookmarks.html file then click ok.

If it was successful you will recieve the following message.

I performed the following actions using Firefox 3.0 and Internet Explorer 7. I hope this post was helpful to you.
The Firefox profile is located in the following location:
C:\Documents and Settings\username\Application Data\Mozilla\Firefox\Profiles\5hh2ca14.default

Much of the contents of this file is in gobbley gook which can only be read by Firefox itself.

After a good hunt around on the internet I discovered a little third party tool 45.4 KB in size that converts back the bookmarks.html file to Internet Explorer favorites. This tool can be downloaded from:
http://downloads.pcworld.com/pub/new/internet/browsers_and_clients/favtool.exe
When you launch the executable file, you will be presented with the following screen. Simply enter in the Favorites folder location under your user profile then click Import Bookmarks into Favorites. In the window that pops up specify the location of the bookmarks.html file then click ok.

If it was successful you will recieve the following message.

I performed the following actions using Firefox 3.0 and Internet Explorer 7. I hope this post was helpful to you.
Thursday, April 23, 2009
How to make a USB key into a DOS Boot Disk
I always make all my USB keys bootable with DOS. Because my USB key died today and I had to buy a new one, I thought I'd share with you how to do this.
Why might you want to make your USB key bootable with DOS?
Many firmware updates for motherboard BIOS's and RAID cards require you to boot their flash program off a MS DOS Boot Floppy. This is ugly, floppy disks are a no go as they are unreliable as you know! Instead having your USB Key bootable, you can simply copy the flash program exe along with the new firmware image, boot of your USB key and run it without touching a floppy disk. Very handy to have in your tool kit!
How to do this?
First we need a DOS Image, nothing better then the Windows 98 SE one. That one is still circulating and is one of the most popular boot disks of all time. I downloaded mine from allbootdisks.com however feel free to download it from where ever. Here is a direct link for you:
http://www.allbootdisks.com/downloads/Disks/Windows_98_Boot_Disk_Download49/Diskette%20Images/Windows98_SE.img
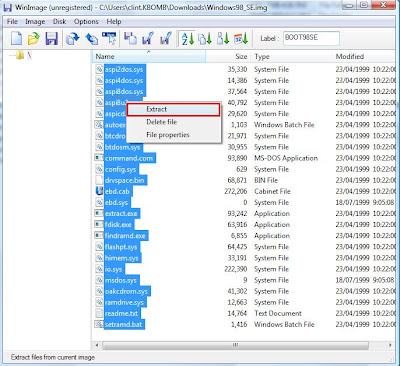
Now we need to extract all these files to a folder somewhere on your PC. To do this grab the 30 day free trial of WinImage. Get it from download.com by searching winimage.
Create a folder and extract the files from the Windows98_SE.img file as below to the new folder you created:
Why might you want to make your USB key bootable with DOS?
Many firmware updates for motherboard BIOS's and RAID cards require you to boot their flash program off a MS DOS Boot Floppy. This is ugly, floppy disks are a no go as they are unreliable as you know! Instead having your USB Key bootable, you can simply copy the flash program exe along with the new firmware image, boot of your USB key and run it without touching a floppy disk. Very handy to have in your tool kit!
How to do this?
First we need a DOS Image, nothing better then the Windows 98 SE one. That one is still circulating and is one of the most popular boot disks of all time. I downloaded mine from allbootdisks.com however feel free to download it from where ever. Here is a direct link for you:
http://www.allbootdisks.com/downloads/Disks/Windows_98_Boot_Disk_Download49/Diskette%20Images/Windows98_SE.img
Now we need to extract all these files to a folder somewhere on your PC. To do this grab the 30 day free trial of WinImage. Get it from download.com by searching winimage.
Create a folder and extract the files from the Windows98_SE.img file as below to the new folder you created:

Once the files have been extracted to the folder we can now download the HP USB Disk Storage Format Tool. You can download this from our friendly guys at bootdisk.com. I have provided you with a direct link below:
http://www.bootdisk.com/plan081009/hpflash1.zip
Extract the zip and run the exe to install the application then run it. Partition your USB Key as FAT32, click "Create a DOS startup disk" and point the path at the folder you created containing the extracted Windows 98 bootdisk. Do not point it at a file inside the folder, just the folder itself. Quick Format does not need to be selected however I selected it because I hate waiting and its a new usb key so there is no data that needs to be overwritten with 0's. Your options should look similar to this:

Once complete your USB Key will now be bootable. This utility will not copy all the windows 98 boot disk files only the core ones including COMMAND.EXE, IO.SYS and MSDOS.SYS. These are marked as protected operating system files and are only viewable by going into Folder Options and checking Show hidden files and folders and unticking the Hide protected operating system files (Recommended) checkbox.
I hope this post has been helpful to you.
Monday, April 13, 2009
User Keeps getting Temp Profile on Vista
In windows XP you could simply delete cached roaming profiles by going to Documents and Settings and deleting the profiles you no longer want. However on Vista if you delete profiles from c:\users it will cause problems. You must do it the proper way by going through System Properties, User Profiles and removing them from there as shown:

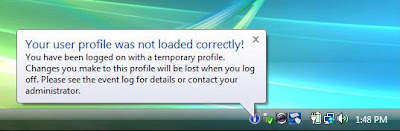
If you delete a cached profile from c:\users using explorer or command prompt, next time the user logs in he will always be presented with a tempoary profile. The Vista PC will not download the cached profile from the server like it should. The user will also be displayed with this error:
What causes this, Vista now tracks user profiles in the registry under:
HKEY_LOCAL_MACHINE\Software\Microsoft\Windows NT\CurrentVersion\ProfileList
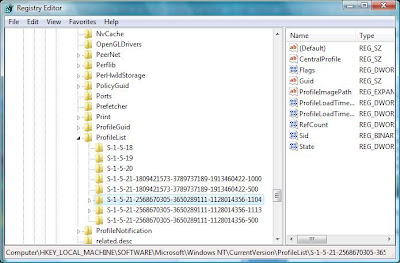
If you accidently deleted cached profiles from c:\users simply log into the vista PC with a local administrator account and navigate to this registry key. Delete all the SIDS of user accounts whos cached profiles have been deleted from the registry. Now next time the user logs in, it will automatically download their roaming profile from the server again.
To prevent having to do this registry hack in future, please ensure you always delete profiles through User Profiles under System Properties.

If you delete a cached profile from c:\users using explorer or command prompt, next time the user logs in he will always be presented with a tempoary profile. The Vista PC will not download the cached profile from the server like it should. The user will also be displayed with this error:

What causes this, Vista now tracks user profiles in the registry under:
HKEY_LOCAL_MACHINE\Software\Microsoft\Windows NT\CurrentVersion\ProfileList

If you accidently deleted cached profiles from c:\users simply log into the vista PC with a local administrator account and navigate to this registry key. Delete all the SIDS of user accounts whos cached profiles have been deleted from the registry. Now next time the user logs in, it will automatically download their roaming profile from the server again.
To prevent having to do this registry hack in future, please ensure you always delete profiles through User Profiles under System Properties.
Friday, April 10, 2009
Windows Software Print Server
I had a client today that has around 40 windows PC’s on a workgroup network. One of these PC’s as a USB printer attached. However the USB controller on the mainboard died and none of the computers were able to print. I could of installed the printer on another PC and shared it out, however that would mean every PC would need to map the new printer. Instead I used a program called Brooks RPM Select LPD Print Manager to setup a software print server – very handy and comes with a free 21 day free trial. This allowed me to re-add the printer as a TCP/IP network printer on the computer with the failed USB and share it out with the same name without modifying any settings on any of the workstations. I only advise using this as a temporary solution to get users up and printing again.
Heres how to do this.
1. Install Brooks RPM Select LPD Print Manager on the new PC which has the printer physically connected.
2. In RPM, choose Create from the Queue menu.
3. Enter the name of the new queue you wish to add and click Create. The new queue will be created.
4. Highlight the queue and choose Settings from the Queue menu. Add the printer as a raw printing device to the new queue you made.
On the computer with the failed USB perform the following:
1. Perform a telnet test to verify your computer can connect to RPM. To do so, type the following at a command prompt (cmd.exe): telnet 515. Substitute the IP address or hostname of your RPM host where appropriate.
2. A successful connection shows a "connected to -address-," message indicating connectivity. After pressing Enter, the connection will close and show a "unknown LPD command" message. If the RPM log has this same message, your telnet test was successful.
3. In the Windows Printers folder, select Add Printer. Review the Add Printer Wizard's introduction page and click Next.
4. In the first step, choose Local printer attached to this computer, deselect Automatically detect and install my plug and play printer.
5. When prompted, select Create a new port, highlight Standard TCP/IP Port and click next. The Add Standard TCP/IP Printer Port Wizard will begin. Click Next on the Introduction page.
6. Enter the RPM host's IP address in the Printer Name or IP Address field. Either accept the default Port Name or enter a new name and click Next.
7. Windows will attempt to configure the port using SNMP. Because RPM does not support SNMP, the wizard will tell you that additional port information is required. Choose Custom and click Settings.

8. Select the LPR protocol, enter the RPM queue name in the parameter. LPR byte counting is optional, but SNMP status should not be enabled. Click OK when finished. Click Next, then Finish to complete the Add Standard TCP/IP Printer Port wizard.

9. Complete the Add Print Wizard by selecting the correct printer software. You might also use the Generic/Text Only print driver in certain situations.
10. Reshare the printer out with the same share name as before. All your workstations will continue printing as normal.
Remember this will only work for 21 days unless you purchase the software. However if you want to permantly move the printer, I would stay back one night and point all the pc’s to the new computer sharing out the printer. Remember this post is only refering to workgroups, for a domain you can use logon scripts etc to correct the printer mapping. You can even force all workstations to re-run the logonscript by using software such as PsTools. It is not every day you need to do a procedure like this - but its handy to know there is software out there that supports it.
Wednesday, April 8, 2009
Reduce Attack Surface on Speedtouch devices
In this blog post I am going to discuss how to reduce the attack surface of SpeedTouch modem/routers. In this tutorial I will be working with the Thomson SpeedTouch 5x6, however this should apply to all Alcatel/Thompson speedtouch modems. I was working on a Alcatel speedtouch the other day, its firmware was released in 1999, and it looked almost identical.
Just to put it out there, from experience I believe SpeedTouch ADSL products are some of the best on the market for the price you pay. They are rock solid – I have never had a speedtouch modem/router crash on me and require a power cycle and every time I have diagnosed internet connectivity issues, the issue has been narrowed down to something other than the modem itself.
Let’s begin... by default the IP address for all speedtouch products is 10.0.0.138, however on your network you have properly changed it. In my scenario I have my speedtouch bridged into a linux router, but I have still given it a LAN IP address so I can access it. My router has an IP of 10.0.0.1 and my speedtouch is on 10.0.0.2 (a separate segment to my core network). Telnet your device, the default credentials are admin/admin for username and password. Note: I have seen some speedtouches out there that use admin/password as the default credentials.
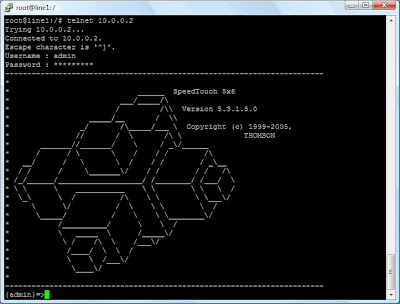
When you login you should be presented with a screen like this, however you will properly have a different speedtouch model and be running different firmware.
If you hit ? and hit enter, it will display you all the menus you can enter.
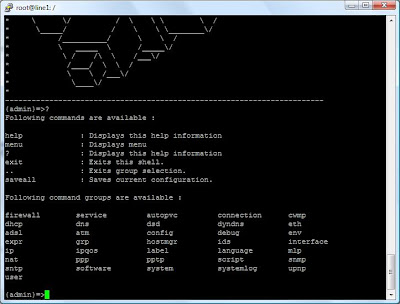
Nagivate to service --> system. Once in this menu type list to display all the current services you have installed in your running firmware and which ones are enabled.
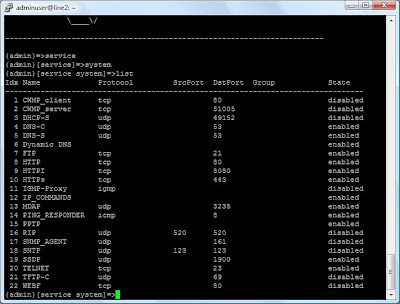
As you see there are many services running by default, many which you do not need. Not only do they make it easier for hackers by giving them more targets to exploit, it also adds load to your modem/router by having these daemons running. I recommend disabling all services except telnet, PING_RESPONDER, Dynamic DNS and the DNS client (DNS-C). Your modem should not have to act as a DNS Server, many cases you will have an Active Directory domain controller running DNS or a bind server somewhere in your organisation.
Additionally I do not use the web interface for speedtouches, I find them extremely limited, and a very annoying layout. You may want to keep HTTP running, however I recommend disabling it!
To disable a service type modify. All data you enter here is K-Sensitive. Enter data in a similar fassion to my screenshot below:
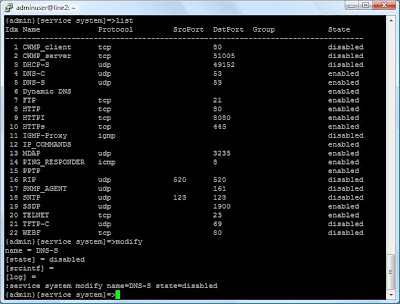
Hit enter for all other values in the modify wizard, that will leave these values at default. The DNS Server is now disabled. Continue through disabling the unwanted services, make sure you don’t disable telnet otherwise you will have to restore factory defaults.
A few weird protocols are SSDP and MDAP.
SSDP stands for Simple Service Discovery Protocol. It is an expired IETF protocol. It is used to provide a mechanism which network clients can use to discover network services. It is no longer needed!
MDAP is protocol used by Speedtouch devices to issue commands to CPEs (called ants) using multicast address 224.0.0.103 and port 3235 registered by IANA. It is usually used when you want to do something like update the firmware on your router. This protocol can be manually enabled if you ever need to use it, other than that I recommend leaving it disabled.
Side note: to trigger a firmware upgrade navigate to software under the root menu and just type upgrade... as in the example below.

This is my service screen now that I have finished disabling all my unwanted services:

Time to save the config. Navigate back to the root menu by typing .. twice. Then enter the config menu. Type “list” to list your current configuration files.

Note it is possible to download this user.ini file if you go back and enable FTP, you can simply transfer the entire configuration file for config backup purposes. Pretty handy!
Next type save, give it the same filename user.ini as this is the default config file it loads

You’re done. Hope you benefitted out of this tutorial. Drop me an email for any feedback.
Just to put it out there, from experience I believe SpeedTouch ADSL products are some of the best on the market for the price you pay. They are rock solid – I have never had a speedtouch modem/router crash on me and require a power cycle and every time I have diagnosed internet connectivity issues, the issue has been narrowed down to something other than the modem itself.
Let’s begin... by default the IP address for all speedtouch products is 10.0.0.138, however on your network you have properly changed it. In my scenario I have my speedtouch bridged into a linux router, but I have still given it a LAN IP address so I can access it. My router has an IP of 10.0.0.1 and my speedtouch is on 10.0.0.2 (a separate segment to my core network). Telnet your device, the default credentials are admin/admin for username and password. Note: I have seen some speedtouches out there that use admin/password as the default credentials.

When you login you should be presented with a screen like this, however you will properly have a different speedtouch model and be running different firmware.
If you hit ? and hit enter, it will display you all the menus you can enter.

Nagivate to service --> system. Once in this menu type list to display all the current services you have installed in your running firmware and which ones are enabled.

As you see there are many services running by default, many which you do not need. Not only do they make it easier for hackers by giving them more targets to exploit, it also adds load to your modem/router by having these daemons running. I recommend disabling all services except telnet, PING_RESPONDER, Dynamic DNS and the DNS client (DNS-C). Your modem should not have to act as a DNS Server, many cases you will have an Active Directory domain controller running DNS or a bind server somewhere in your organisation.
Additionally I do not use the web interface for speedtouches, I find them extremely limited, and a very annoying layout. You may want to keep HTTP running, however I recommend disabling it!
To disable a service type modify. All data you enter here is K-Sensitive. Enter data in a similar fassion to my screenshot below:

Hit enter for all other values in the modify wizard, that will leave these values at default. The DNS Server is now disabled. Continue through disabling the unwanted services, make sure you don’t disable telnet otherwise you will have to restore factory defaults.
A few weird protocols are SSDP and MDAP.
SSDP stands for Simple Service Discovery Protocol. It is an expired IETF protocol. It is used to provide a mechanism which network clients can use to discover network services. It is no longer needed!
MDAP is protocol used by Speedtouch devices to issue commands to CPEs (called ants) using multicast address 224.0.0.103 and port 3235 registered by IANA. It is usually used when you want to do something like update the firmware on your router. This protocol can be manually enabled if you ever need to use it, other than that I recommend leaving it disabled.
Side note: to trigger a firmware upgrade navigate to software under the root menu and just type upgrade... as in the example below.

This is my service screen now that I have finished disabling all my unwanted services:

For some reason it wouldn’t let me disable HTTPI so I left it running.
Time to save the config. Navigate back to the root menu by typing .. twice. Then enter the config menu. Type “list” to list your current configuration files.

Note it is possible to download this user.ini file if you go back and enable FTP, you can simply transfer the entire configuration file for config backup purposes. Pretty handy!
Next type save, give it the same filename user.ini as this is the default config file it loads

You’re done. Hope you benefitted out of this tutorial. Drop me an email for any feedback.
Monday, April 6, 2009
SCC (Single Copy Clusters) vs CCR (Continuous Cluster Replication)
In this blog post i’m going to run both SCC and CCR Exchange 2007 high availability clustering methods for Exchange Mailbox servers and sum up which is the better solution.
Single Copy Clusters
Single Copy Clusters have been around for a while and is the same clustering principal that was used in Exchange 2000/2003.
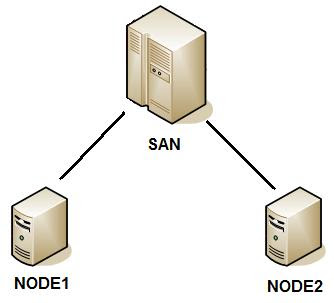
Here is your typical SCC layout. You would normally have two or more LUN’s on the SAN, one for Transaction Logs and one for the exchange database. These LUN’s get presented to both servers. MSCS (Microsoft Cluster Service) controls which server has access to the exchange LUN’s. Each database instance only exists once hence the exchange database is only ever mounted on one exchange server at a given time.
If NODE1 (lets say the passive node) fails, after a set number of heart beat failures it will transfer the cluster resources to NODE2 which will then gain access to the exchange resources.
Continuous Cluster Replication
Continuous Cluster Replication is a new feature introduced in Exchange 2007.
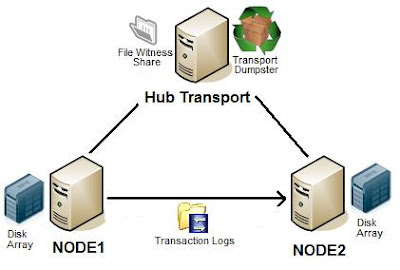
Above we have a basic CCR setup in a single Active Directory site. With CCR clusters both exchange mailbox servers have a copy of the database and log files. These can still be located on a single SAN, however this would require double the amount of luns and use up double the amount of storage.
How CCR works - say NODE1 is the active mailbox server, when a transaction log gets full.. it will play it into it’s own database as normal. However it will also copy the transaction log over to the passive mailbox server NODE2, which will play the copied log file into its own mailbox database. You would have remembered in Exchange 2000/2003 transaction log files were 5MB in size. In exchange 2007 log files have been reduced to 1MB in size for the purpose of CCR, to ensure that transaction logs are copied as frequently as possible the passive node.
What happens if NODE1 crashs and there are log files that have not been copied over, is this email lost?
No that is the role of the transport dumpster. The transport dumpster resides on every hub transport server by default however it is not used unless a CCR mailbox cluster exists. What the transport dumpster does is hold email that has already been delivered to the active mailbox server for a specified period of time. In the event that a CCR node dies which prevents the most recent logs from being replicated over, the transport dumpster can redeliver this email.
You can view the transport dumpster by typing Get-TransportConfig. Two important settings for this command are MaxDumpsterSizePerStorageGroup and MaxDumpsterTime.
MaxDumpsterSizePerStorageGroup is a universal maximum size of the transport dumpster que for all storage groups. You cannot set this on a storage group by storage group basis.
MaxDumpsterTime is the amount of time mail will stay int he dumpster queue.
With CCR clusters there is a heartbeat between the active and passive nodes. However there is also a third party that governs this called a File Witness Share which can be located on any server however Microsoft recommends putting it on a hub transport server. If a set number of heart beats fail it will check the quorum file located in the file witness share. If this quorum also reports the active node being down, the passive node will take control and a failover will occur.
What is the Copy Queue Length?
The Copy Queue Length is the number of log files that are waiting to be copied to the passive storage group in a CCR or LCR high availability solution.
Note: If your installing a CCR cluster on Windows Server 2003, you need to be running Windows Server 2003 service pack 2, or ensure you have hotfix KB921181 installed to fix a known bug with the file witness share for MNS (Majority Node Set) clusters - which is what CCR is.
Which is better?
The only time I would ever implement SCC in Exchange 2007 is when disk space is an issue - however i'd push strongly to the client to upgrade their storage in order to implement CCR.
With SCC if a failover occurs, the passive node needs to mount the exchange database, and load all the common data into memory for store.exe (which is usually a fair bit). It needs to review the check point file to verify where abouts the previous server was up to in the log files in regards to replaying log files into the exchange database as well as starting all the exchange 2007 related services that the mailbox role holds. On a very busy Exchange 2007 mailbox server, sometimes it takes minutes to completely fail over!
In a CCR cluster however, all these services are already started, the mailbox is already mounted. If a failover occurs, it happens within seconds. Much faster then the SCC solution.
Additionally what happens if an exchange mailbox database goes corrupt and you need to repair it with eseutil. In an SCC scenario this would result in down time. With CCR you could just trigger a failover (as the other server would have a good copy of the database). During this time you can then run the mailbox repair utilities on the bad mailbox on the failed node.
Microsoft built Exchange 2007 to be used with CCR, my advise as an engineer in the field, use it!
Sunday, April 5, 2009
Viewing DNS Cache
How do you view your DNS cache?
Very simple, just simply select Advanced from the view menu. Allows you to delete records from the cache as needed instead of flushing the whole cache whenever a bad record exists.


Very simple, just simply select Advanced from the view menu. Allows you to delete records from the cache as needed instead of flushing the whole cache whenever a bad record exists.


Saturday, April 4, 2009
Exchange 2007 Monitoring RBL Providers
You have entered a bunch of RBL’s into your IP Block List Providers. I personally use the four spamhaus providers having great success with these from past experience.
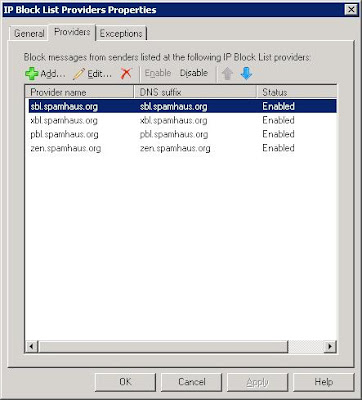
How do you know these RBL’s are working? Where do you get information about what they are doing? Which RBL provider is blocking the most?
Well by default the RBL logs are located under:
C:\Program Files\Microsoft\Exchange Server\TransportRoles\Logs\AgentLog
If I crack one of these log files open it will look similar to this:
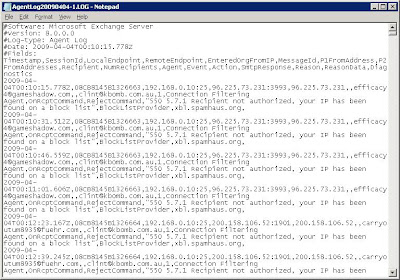
When an incoming sender’s IP is found in an RBL, the SMTP connection from the sender is dropped and the contents of the spam email will never reach your organisation. Because of this, spam detected by an RBL will never appear in your quarentine mailbox. RBL checks are done before the Exchange Content filter. Most exchange administrators that run RBL's will notice little spam appearing in the spam mailbox because RBL's will filter most the spam out. Additionally mail blocked by an RBL will not appear in the Message Tracking Log which is viewable by typing Get-MessageTrackingLog.
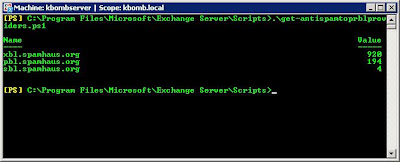
It is possible to get summary information from all the RBL log files by using a powershell script called get-antispamtoprblproviders.ps1 located by default in C:\Program Files\Microsoft\Exchange Server\Scripts


How do you know these RBL’s are working? Where do you get information about what they are doing? Which RBL provider is blocking the most?
Well by default the RBL logs are located under:
C:\Program Files\Microsoft\Exchange Server\TransportRoles\Logs\AgentLog
If I crack one of these log files open it will look similar to this:

When an incoming sender’s IP is found in an RBL, the SMTP connection from the sender is dropped and the contents of the spam email will never reach your organisation. Because of this, spam detected by an RBL will never appear in your quarentine mailbox. RBL checks are done before the Exchange Content filter. Most exchange administrators that run RBL's will notice little spam appearing in the spam mailbox because RBL's will filter most the spam out. Additionally mail blocked by an RBL will not appear in the Message Tracking Log which is viewable by typing Get-MessageTrackingLog.
It is possible to get summary information from all the RBL log files by using a powershell script called get-antispamtoprblproviders.ps1 located by default in C:\Program Files\Microsoft\Exchange Server\Scripts


Above the get-antispamtoprblproviders.ps1 script shows a summary of how many emails were blocked by each provider in my exchange organization. This information was produced by searching through my 4 log files.
The get-antispamtoprblproviders.ps1 script also has 3 parameters:
-startdate
-enddate
-top
-startdate
-enddate
-top
Startdate and Enddate explain themselves... however top shows the top providers in order. For example if you wanted to see your top 2 RBL’s blocking the most email you would enter in –top:2
Hope this helps you monitor your RBL providers better.
Moving the Offline Files Cache in Windows Vista
I needed to move my offline files cache from c:\ to d:\ as I use folder redirection on my documents, desktop and many other folders resulting in a large amount of offline data and insufficient free space on c:\.
I found an excellent howto on the technet blogs on how to do this:
http://blogs.technet.com/filecab/archive/2006/12/12/moving-the-offline-files-cache-in-windows-vista.aspx
Well worth a read.. as its very different to using the Offline Files Cache Mover tool (cachemov.exe) like we had to with Windows 2000/XP.
NDR Bug with Exchange 2007 Update Rollout 7
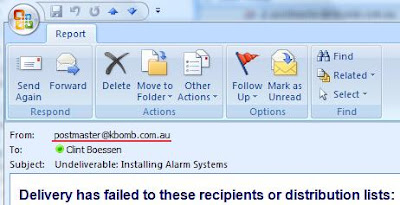
There is a bug with Update Rollup 7 for Exchange Server 2007 (KB953469) in regards to NDR's. By default Exchange 2007 NDR's come from MicrosoftExchange@yourdomain.com.
After installing Update Rollup 7 for Exchange Server 2007 (KB953469) all NDR's now come from MicrosoftExchange329e71ec88ae4615bbc36ab6ce41109e@yourdomain.com.
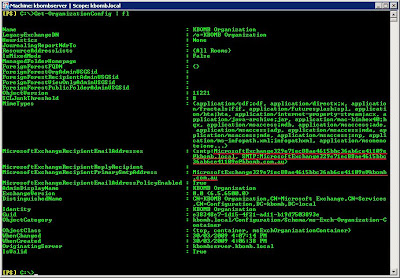
After using ldp.exe to search active directory for the value MicrosoftExchange329e71ec88ae4615bbc36ab6ce41109e@kbomb.com.au I discovered it comes from the attributes MicrosoftExchangeRecipientEmailAddresses and MicrosoftExchangeRecipientPrimarySmtpAddress in the Exchange Organisational Config.
Below is the output of my powershell command Get-OrganizationConfig fl showing you the dodgy email addresses:
I also found out by messing around that the bad email address MicrosoftExchange329e71ec88ae4615bbc36ab6ce41109e@kbomb.com.au is being generated by the email address policy.
As a temporary work around until Microsoft releases an official fix, disable the email address policy for the Organization Config email address:
Set-OrganizationConfig -MicrosoftExchangeRecipientEmailAddressPolicyEnabled $false
Then set the MicrosoftExchangeRecipientPrimarySmtpAddress address back to MicrosoftExchange@yourdomain.com or whatever you want it to be. I personally prefer postmaster as it's the internet standard for NDR's that most mailservers follow.
Set-OrganizationConfig -MicrosoftExchangeRecipientPrimarySmtpAddress postmaster@kbomb.com.au
Now my NDR's are coming from postmaster@kbomb.com.au. Much better!
Note: Disabling the Email Address Policy for your Organization Config does not effect the rest of your recipients. They will continue using the Email Address Policy as normal.
After installing Update Rollup 7 for Exchange Server 2007 (KB953469) all NDR's now come from MicrosoftExchange329e71ec88ae4615bbc36ab6ce41109e@yourdomain.com.
After using ldp.exe to search active directory for the value MicrosoftExchange329e71ec88ae4615bbc36ab6ce41109e@kbomb.com.au I discovered it comes from the attributes MicrosoftExchangeRecipientEmailAddresses and MicrosoftExchangeRecipientPrimarySmtpAddress in the Exchange Organisational Config.
Below is the output of my powershell command Get-OrganizationConfig fl showing you the dodgy email addresses:

I also found out by messing around that the bad email address MicrosoftExchange329e71ec88ae4615bbc36ab6ce41109e@kbomb.com.au is being generated by the email address policy.
As a temporary work around until Microsoft releases an official fix, disable the email address policy for the Organization Config email address:
Set-OrganizationConfig -MicrosoftExchangeRecipientEmailAddressPolicyEnabled $false
Then set the MicrosoftExchangeRecipientPrimarySmtpAddress address back to MicrosoftExchange@yourdomain.com or whatever you want it to be. I personally prefer postmaster as it's the internet standard for NDR's that most mailservers follow.
Set-OrganizationConfig -MicrosoftExchangeRecipientPrimarySmtpAddress postmaster@kbomb.com.au
Now my NDR's are coming from postmaster@kbomb.com.au. Much better!

Note: Disabling the Email Address Policy for your Organization Config does not effect the rest of your recipients. They will continue using the Email Address Policy as normal.
Subscribe to:
Posts (Atom)